Node.js is an open-source, cross-platform JavaScript runtime environment for developing a wide variety of tools and applications. Node.js runs on most operating systems, including Linux, OSX and Windows. This guide will show you how run Node.js as a service, so your apps will automatically restart when the server is rebooted or if there is a failure.
Requirements:
Your application server will run Node.js applications managed by PM2, while your web server will provide users with access to the application via an NGINX reverse proxy to the application server.
This guide uses two Ubuntu servers. We will refer to these servers by the following names:
- App: The server where we will install your Node.js application, Node.js runtime, and PM2.
- Web: This is where we will install the NGINX web server, which will act as a reverse proxy to your application. Users will use the web server's public IP address or domain to get to your Node.js application.
Install Node.js
This section is completed on your App server.
Note: If the version is displayed, Node.js's runtime is now installed and ready to run an application.
- Update your apt packages:sudo apt-get update
- Install git.sudo apt-get install git
- Copy the download link for Node.js from the Node.js Downloads page. Locate the 64-bit Linux Binaries (.tar.xz) download link. Right-click the link and copy it to your clipboard.
- Change to your home directory.cd ~
- Type in wget and paste the download link in place of the highlighted URL below:wget https://nodejs.org/dist/v6.9.1/node-v6.9.1-linux-x64.tar.xz
- Create a directory for Node.js.mkdir node
- Extract the archive you downloaded into the node directory:tar xvf node-v*.tar.xz --strip-components=1 -C ./node
- Create an etc folder in the node folder.mkdir node/etc
- Configure npm's global prefix. Npm will create symbolic links to installed Node.js packages, to your default path. Set the path to /usr/local:echo 'prefix=/usr/local' > node/etc/npmrc
- Move the npm and Node.js binaries to the /opt/node install location:sudo mv node /opt/
- Make root the owner of the file:sudo chown -R root: /opt/node
- Create symbolic links of the Node.js and npm binaries in the default path:sudo ln -s /opt/node/bin/node /usr/local/bin/node
sudo ln -s /opt/node/bin/npm /usr/local/bin/npm - Save and close the file.
- You can verify if Node.js is installed by checking its version:node -v
Create a Node.js Application
We will create a simple application that returns "Hello World" to any incoming HTTP requests. This is merely a sample application that's going to help you get Node.js set up. You can replace it with your own application, and modify the application to listen on the correct IP addresses and ports.
This Node.js application will listen on the specified port and IP addresses and return "Hello World" with a 200 HTTP success code.
Test the Application (Optional)
Note: Running Node.js in this way will block additional commands until the application is terminated by pressing CTRL+C.
Note: Kill the application by pressing CTRL+C on your app server.
Set your Node.js application to use your Private IP address.
Now that we have confirmed the application is working properly, we need to switch the hello.js IPs from the app server's public IP to the private IP. Your App server's Private IP address can be found in Cloud Servers under the IP & DNS tab. Find a server's private IP address.
- Find your App server's Public IP address. Your App server's Public IP address can be found in Cloud Servers under the IP & DNS tab. Find your server's IP.
- Create and edit your Node.js application. In our example, we will edit a sample application called hello.js.cd ~
vim hello.js - Insert the code below into your the hello.js file. Make sure to replace the app server's Public IP address for both of highlighted APP_SERVER_PRIVATE_IP:8080 items. You may also need to replace the highlighted port, 8080, in both locations if you're using different ports, but make sure to use a non-admin port like 1024 or greater:var http = require('http');
http.createServer(function (req, res){
res.writeHead(200, {'Content-Type': 'text/plain'});
res.end('Hello World\n');
}).listen(8080, 'APP_SERVER_PUBLIC_IP');
console.log('Server running at http://APP_SERVER_PUBLIC_IP_ADDRESS:8080/'); - Save and exit.
- Test your application on your app server:node hello.js
- Test your application by opening http://YOUR_APP_SERVER_IP:8080 in a browser window, using your own public IP.
- If you receive the "Hello World" output, your application is working properly.
- If you received an incorrect output, make sure your Node.js application is both running and also configured to listen on the correct IP address and port.
- Navigate back to your home directory and re-open your hello.js file with vim.cd ~
vim hello.js - Replace the app server's Public IP address for both of highlighted APP_SERVER_PRIVATE_IP:8080 items with your app server's Private IP address.var http = require('http');
http.createServer(function (req, res) {
res.writeHead(200, {'Content-Type': 'text/plain'});
res.end('Hello World\n');
}).listen(8080, 'APP_SERVER_PRIVATE_IP');
console.log('Server running at http://APP_SERVER_PRIVATE_IP_ADDRESS:8080/'); - Save and exit.
Install and configure PM2
We will use PM2 to manage Node.js applications. PM2 makes it easy to automate and manage applications by running them as a service.
Manage Application with PM2
Your application will be added to PM2's process list, which will be displayed each time you start an application:
Here's an example output:
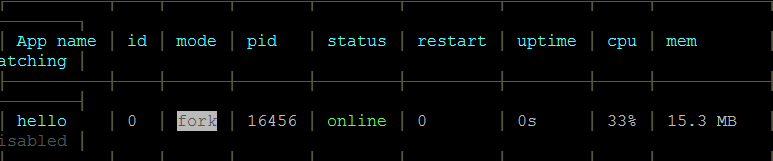
As you probably noticed, PM2 automatically assigns an App name that's based on the filename and PM2 id. PM2 also maintains information such as the PID of the process, memory usage and the current status.
Note: If an application that is running under PM2 crashes or is killed, it will be automatically restarted. However, additional steps are necessary to get the application to launch on system startup (boot or reboot). Fortunately, PM2 makes it easy with the startup subcommand.
The startup subcommand creates and configures a startup script that launches PM2 and its managed processes when the server boots. It's also important to specify the init system you're running. Since we are on a Ubuntu server, it's systemd.
You should see output like the following, which indicates that the pm2 service has been installed.
Output:
[PM2] Generating system init script in /etc/systemd/system/pm2.service
[PM2] Making script booting at startup...
[PM2] -systemd- Using the command:
su root -c "pm2 dump & pm2 kill" & su root -c "systemctl daemon-reload & systemctl enable pm2 & systemctl start pm2"
[PM2] Dumping processes
[PM2] Stopping PM2...
[PM2] All processes have been stopped and deleted
[PM2] PM2 stopped
[PM2] Done.
Your application should now start automatically upon server boot.
- Use Node.js Packaged Modules (NPM) to install PM2 on our app server. Npm is a package manager for installing Node.js modules.sudo npm install pm2 -g
- Start the application with PM2 so that it runs in the background:pm2 start hello.js
- Run Pm2 startup.sudo pm2 startup systemd
Other PM2 Usage (Optional)
PM2 provides quite a few subcommands that allow you to look up or manage information about your Node.js applications. If you run PM2 without any arguments, it will display a help page. The help page provides usage examples that covers PM2 usage in greater detail if needed.
- If you wish to stop an application, you can use the stop command. Make sure to specify the PM2 Id or App name.$ pm2 stop App or ID
- Restart the application. Be sure to indicate the app name or ID.pm2 restart App or ID
- YList the applications currently managed by PM2:$ pm2 list
- By using the info subcommand, you can find more information about a specific application. Make sure you specify the PM2 id or App name in place of the highlighted portion:pm2 info App or ID
- You can pull up the PM2 process monitor by using the monit subcommand. This will show you metrics such as memory usage, CPU usage and application status:sudo apt-get update pm2 monit
Set up the Reverse Proxy Server with NGINX
Now that we have established that your Node.js application is running and listening on the Private address, we now need a way for users to access it on the web. To do this, we will set up an NGINX web server as a reverse proxy, which will allow access for our users. This section will be done on the Web server.
Note: Using this configuration allows the Web Server to respond to requests at its root. As long as our server is available at example.com, accessing http://example.com/ through a web browser will send the requests to the application server's Public IP address on port 8080. Once this request is received, Node.js will reply to the request.
- Update your packages:sudo apt-get update
- Install NGINX:sudo apt-get install nginx
- Open the NGINX server block configuration file:sudo vim /etc/nginx/sites-available/default
- Add the server's Private IP address for the APP_SERVER_PRIVATE_IP portion. Additionally, change the port (8080) if you set up your application is set to listen on a different port. Locate the line where / is defined starting with the default server block. It should look something like this:
- NGINX location block before edit:location / {
}
- NGINX location block after edit:location / {
proxy_pass http://APP_SERVER_PRIVATE_IP:8080;
proxy_http_version 1.1;
proxy_set_header Upgrade $http_upgrade;
proxy_set_header Connection 'upgrade';
proxy_set_header Host $host;
proxy_cache_bypass $http_upgrade;
} - Restart NGINX on your Web server:sudo service nginx restart
As long as your application and NGINX configurations are correct, and your Node.js application is running, you should be able to access your application through the reverse proxy of the web server. You can test it by accessing your web server's URL. This will either be its public IP, or a domain if a domain has been setup.
If you see the Hello World message in your browser, your installation and configuration were successful.
Conclusion
Your Node.js application is now running behind an NGINX reverse proxy on your Ubuntu servers. By using this reverse proxy method, you have the flexibility to provide users with access to other applications or even static web content.