Introduction
TLS, or transport layer security, and its predecessor SSL, which stands for secure sockets layer, are web protocols used to wrap normal traffic in a protected, encrypted wrapper.
Using this technology, servers can send traffic safely between the server and clients without the possibility of the messages being intercepted by outside parties. The certificate system also assists users in verifying the identity of the sites that they are connecting with.
In this guide, we will show you how to set up a self-signed SSL certificate for use with an Nginx web server on a CentOS 7 server.
Note: A self-signed certificate will encrypt communication between your server and any clients. However, because it is not signed by any of the trusted certificate authorities included with web browsers, users cannot use the certificate to validate the identity of your server automatically.
A self-signed certificate may be appropriate if you do not have a domain name associated with your server and for instances where the encrypted web interface is not user-facing. If you do have a domain name, in many cases it is better to use a CA-signed certificate. To learn how to set up a free trusted certificate, follow our guide on setting up Nginx with a Let’s Encrypt certificate on CentOS 7.
Prerequisites
First, you should have a non-root user configured with
sudo privileges. You can learn how to set up such a user account by following our initial server setup for CentOS 7.
When you are ready to get started, log into your server as your
sudo user.Step 1: Install Nginx and Adjust the Firewall
Before we begin, we should make sure that the Nginx web server is installed on our machine.
While Nginx is not available in CentOS’s default repositories, it is present in the EPEL (extra packages for Enterprise Linux) repository. We can enable the EPEL repository to give our server access to the Nginx package by typing:
- sudo yum install epel-release
Next, we can install Nginx by typing:
- sudo yum install nginx
Start the Nginx service by typing:
- sudo systemctl start nginx
Check that the service is up and running by typing:
- systemctl status nginx
Output
● nginx.service - The nginx HTTP and reverse proxy server
   Loaded: loaded (/usr/lib/systemd/system/nginx.service; disabled; vendor preset: disabled)
   Active: active (running) since Fri 2017-01-06 17:27:50 UTC; 28s ago

. . .

Jan 06 17:27:50 centos-512mb-nyc3-01 systemd[1]: Started The nginx HTTP and reverse proxy server.
You will also want to enable Nginx, so it starts when your server boots:
- sudo systemctl enable nginx
Output
Created symlink from /etc/systemd/system/multi-user.target.wants/nginx.service to /usr/lib/systemd/system/nginx.service.
Next, we need to make sure that we are not blocking access to port 80 and 443 with a firewall. If you are not using a firewall, you can skip ahead to the next section.
If you have a firewalld firewall running, you can open these ports by typing:
- sudo firewall-cmd --add-service=http
- sudo firewall-cmd --add-service=https
- sudo firewall-cmd --runtime-to-permanent
If have an iptables firewall running, the commands you need to run are highly dependent on your current rule set. For a basic rule set, you can add HTTP and HTTPS access by typing:
- sudo iptables -I INPUT -p tcp -m tcp --dport 80 -j ACCEPT
- sudo iptables -I INPUT -p tcp -m tcp --dport 443 -j ACCEPT
You should now be able to access the default Nginx page through a web browser.
Step 2: Create the SSL Certificate
TLS/SSL works by using a combination of a public certificate and a private key. The SSL key is kept secret on the server. It is used to encrypt content sent to clients. The SSL certificate is publicly shared with anyone requesting the content. It can be used to decrypt the content signed by the associated SSL key.
The
/etc/ssl/certs directory, which can be used to hold the public certificate, should already exist on the server. Let’s create an /etc/ssl/private directory as well, to hold the private key file. Since the secrecy of this key is essential for security, we will lock down the permissions to prevent unauthorized access:
- sudo mkdir /etc/ssl/private
- sudo chmod 700 /etc/ssl/private
Now, we can create a self-signed key and certificate pair with OpenSSL in a single command by typing:
- sudo openssl req -x509 -nodes -days 365 -newkey rsa:2048 -keyout /etc/ssl/private/nginx-selfsigned.key -out /etc/ssl/certs/nginx-selfsigned.crt
You will be asked a series of questions. Before we go over that, let’s take a look at what is happening in the command we are issuing:
- openssl: This is the basic command line tool for creating and managing OpenSSL certificates, keys, and other files.
- req: This subcommand specifies that we want to use X.509 certificate signing request (CSR) management. The “X.509” is a public key infrastructure standard that SSL and TLS adheres to for its key and certificate management. We want to create a new X.509 cert, so we are using this subcommand.
- -x509: This further modifies the previous subcommand by telling the utility that we want to make a self-signed certificate instead of generating a certificate signing request, as would normally happen.
- -nodes: This tells OpenSSL to skip the option to secure our certificate with a passphrase. We need Nginx to be able to read the file, without user intervention, when the server starts up. A passphrase would prevent this from happening because we would have to enter it after every restart.
- -days 365: This option sets the length of time that the certificate will be considered valid. We set it for one year here.
- -newkey rsa:2048: This specifies that we want to generate a new certificate and a new key at the same time. We did not create the key that is required to sign the certificate in a previous step, so we need to create it along with the certificate. The
rsa:2048portion tells it to make an RSA key that is 2048 bits long. - -keyout: This line tells OpenSSL where to place the generated private key file that we are creating.
- -out: This tells OpenSSL where to place the certificate that we are creating.
As we stated above, these options will create both a key file and a certificate. We will be asked a few questions about our server in order to embed the information correctly in the certificate.
Fill out the prompts appropriately. The most important line is the one that requests the
Common Name (e.g. server FQDN or YOUR name). You need to enter the domain name associated with your server or your server’s public IP address.
The entirety of the prompts will look something like this:
Output
Country Name (2 letter code) [AU]:US
State or Province Name (full name) [Some-State]:New York
Locality Name (eg, city) []:New York City
Organization Name (eg, company) [Internet Widgits Pty Ltd]:Bouncy Castles, Inc.
Organizational Unit Name (eg, section) []:Ministry of Water Slides
Common Name (e.g. server FQDN or YOUR name) []:server_IP_address
Email Address []:admin@your_domain.com
Both of the files you created will be placed in the appropriate subdirectories of the
/etc/ssl directory.
While we are using OpenSSL, we should also create a strong Diffie-Hellman group, which is used in negotiating Perfect Forward Secrecy with clients.
We can do this by typing:
- sudo openssl dhparam -out /etc/ssl/certs/dhparam.pem 2048
This may take a few minutes, but when it’s done you will have a strong DH group at
/etc/ssl/certs/dhparam.pem that we can use in our configuration.Step 3: Configure Nginx to Use SSL
The default Nginx configuration in CentOS is fairly unstructured, with the default HTTP server block living within the main configuration file. Nginx will check for files ending in
.conf in the /etc/nginx/conf.d directory for additional configuration.
We will create a new file in this directory to configure a server block that serves content using the certificate files we generated. We can then optionally configure the default server block to redirect HTTP requests to HTTPS.
Create the TLS/SSL Server Block
Create and open a file called
ssl.conf in the /etc/nginx/conf.d directory:
- sudo vi /etc/nginx/conf.d/ssl.conf
Inside, begin by opening a
server block. By default, TLS/SSL connections use port 443, so that should be our listen port. The server_name should be set to the server’s domain name or IP address that you used as the Common Name when generating your certificate. Next, use the ssl_certificate, ssl_certificate_key, and ssl_dhparam directives to set the location of the SSL files we generated:
/etc/nginx/conf.d/ssl.conf
server {
    listen 443 http2 ssl;
    listen [::]:443 http2 ssl;

    server_name server_IP_address;

    ssl_certificate /etc/ssl/certs/nginx-selfsigned.crt;
    ssl_certificate_key /etc/ssl/private/nginx-selfsigned.key;
    ssl_dhparam /etc/ssl/certs/dhparam.pem;
}
Next, we will add some additional SSL options that will increase our site’s security. The options we will use are recommendations from Remy van Elst on the Cipherli.st site. This site is designed to provide easy-to-consume encryption settings for popular software. You can learn more about his decisions regarding the Nginx choices by reading Strong SSL Security on nginx.
Note: The default suggested settings on Cipherli.st offer strong security. Sometimes, this comes at the cost of greater client compatibility. If you need to support older clients, there is an alternative list that can be accessed by clicking on the link labeled “Yes, give me a ciphersuite that works with legacy / old software.”
The compatibility list can be used instead of the default suggestions in the configuration above between the two comment blocks. The choice of which config you use will depend largely on what you need to support.
There are a few pieces of the configuration that you may wish to modify. First, you can add your preferred DNS resolver for upstream requests to the
resolver directive. We used Google’s for this guide, but you can change this if you have other preferences.
Finally, you should take a moment to read up on HTTP Strict Transport Security, or HSTS, and specifically about the “preload” functionality. Preloading HSTS provides increased security, but can have far reaching consequences if accidentally enabled or enabled incorrectly. In this guide, we will not preload the settings, but you can modify that if you are sure you understand the implications.
/etc/nginx/conf.d/ssl.conf
server {
    listen 443 http2 ssl;
    listen [::]:443 http2 ssl;

    server_name server_IP_address;

    ssl_certificate /etc/ssl/certs/nginx-selfsigned.crt;
    ssl_certificate_key /etc/ssl/private/nginx-selfsigned.key;
    ssl_dhparam /etc/ssl/certs/dhparam.pem;

    ########################################################################
    # from https://cipherli.st/                                            #
    # and https://raymii.org/s/tutorials/Strong_SSL_Security_On_nginx.html #
    ########################################################################

    ssl_protocols TLSv1 TLSv1.1 TLSv1.2;
    ssl_prefer_server_ciphers on;
    ssl_ciphers "EECDH+AESGCM:EDH+AESGCM:AES256+EECDH:AES256+EDH";
    ssl_ecdh_curve secp384r1;
    ssl_session_cache shared:SSL:10m;
    ssl_session_tickets off;
    ssl_stapling on;
    ssl_stapling_verify on;
    resolver 8.8.8.8 8.8.4.4 valid=300s;
    resolver_timeout 5s;
    # Disable preloading HSTS for now.  You can use the commented out header line that includes
    # the "preload" directive if you understand the implications.
    #add_header Strict-Transport-Security "max-age=63072000; includeSubdomains; preload";
    add_header Strict-Transport-Security "max-age=63072000; includeSubdomains";
    add_header X-Frame-Options DENY;
    add_header X-Content-Type-Options nosniff;

    ##################################
    # END https://cipherli.st/ BLOCK #
    ##################################
}
Because we are using a self-signed certificate, the SSL stapling will not be used. Nginx will simply output a warning, disable stapling for our self-signed cert, and continue to operate correctly.
Finally, add the rest of the Nginx configuration for your site. This will differ depending on your needs. We will just copy some of the directives used in the default location block for our example, which will set the document root and some error pages:
/etc/nginx/conf.d/ssl.conf
server {
    listen 443 http2 ssl;
    listen [::]:443 http2 ssl;

    server_name server_IP_address;

    ssl_certificate /etc/ssl/certs/nginx-selfsigned.crt;
    ssl_certificate_key /etc/ssl/private/nginx-selfsigned.key;
    ssl_dhparam /etc/ssl/certs/dhparam.pem;

    ########################################################################
    # from https://cipherli.st/                                            #
    # and https://raymii.org/s/tutorials/Strong_SSL_Security_On_nginx.html #
    ########################################################################

    . . .

    ##################################
    # END https://cipherli.st/ BLOCK #
    ##################################

    root /usr/share/nginx/html;

    location / {
    }

    error_page 404 /404.html;
    location = /404.html {
    }

    error_page 500 502 503 504 /50x.html;
    location = /50x.html {
    }
}
When you are finished, save and exit. This configures Nginx to use our generated SSL certificate to encrypt traffic. The SSL options specified ensure that only the most secure protocols and ciphers will be used. Note that this example configuration simply serves the default Nginx page, so you may want to modify it to meet your needs.
(Optional) Create a Redirect from HTTP to HTTPS
With our current configuration, Nginx responds with encrypted content for requests on port 443, but responds with unencrypted content for requests on port 80. This means that our site offers encryption, but does not enforce its usage. This may be fine for some use cases, but it is usually better to require encryption. This is especially important when confidential data like passwords may be transferred between the browser and the server.
Thankfully, the default Nginx configuration file allows us to easily add directives to the default port 80 server block by adding files in the
/etc/nginx/default.d directory. Create a new file called ssl-redirect.conf and open it for editing with this command:
- sudo vi /etc/nginx/default.d/ssl-redirect.conf
Then paste in this line:
/etc/nginx/default.d/ssl-redirect.conf
return 301 https://$host$request_uri/;
Save and close the file when you are finished. This configures the HTTP on port 80 (default) server block to redirect incoming requests to the HTTPS server block we configured.
Step 4: Enable the Changes in Nginx
Now that we’ve made our changes, we can restart Nginx to implement our new configuration.
First, we should check to make sure that there are no syntax errors in our files. We can do this by typing:
- sudo nginx -t
If everything is successful, you will get a result that looks like this:
Output
nginx: [warn] "ssl_stapling" ignored, issuer certificate not found
nginx: the configuration file /etc/nginx/nginx.conf syntax is ok
nginx: configuration file /etc/nginx/nginx.conf test is successful
Notice the warning in the beginning. As noted earlier, this particular setting throws a warning since our self-signed certificate can’t use SSL stapling. This is expected and our server can still encrypt connections correctly.
If your output matches the above, your configuration file has no syntax errors. We can safely restart Nginx to implement our changes:
- sudo systemctl restart nginx
The Nginx process will be restarted, implementing the SSL settings we configured.
Step 5: Test Encryption
Now, we’re ready to test our SSL server.
Open your web browser and type
https:// followed by your server’s domain name or IP into the address bar:https://server_domain_or_IP
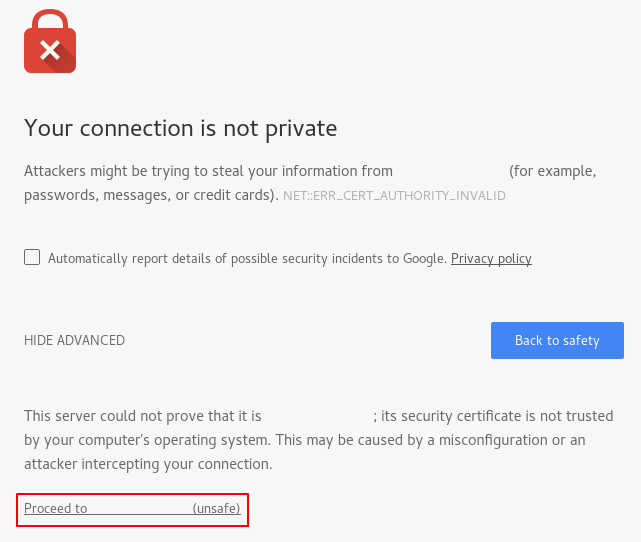
Because the certificate we created isn’t signed by one of your browser’s trusted certificate authorities, you will likely see a scary looking warning like the one below:
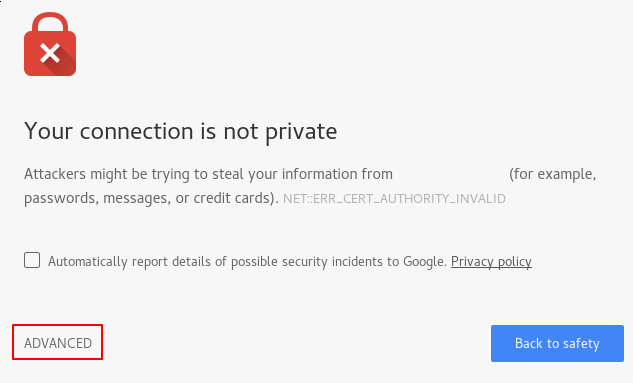
This is expected and normal. We are only interested in the encryption aspect of our certificate, not the third party validation of our host’s authenticity. Click “ADVANCED” and then the link provided to proceed to your host anyway:
You should be taken to your site. If you look in the browser address bar, you will see some indication of partial security. This might be a lock with an “x” over it or a triangle with an exclamation point. In this case, this just means that the certificate cannot be validated. It is still encrypting your connection.
If you configured Nginx to redirect HTTP requests to HTTPS, you can also check whether the redirect functions correctly:
http://server_domain_or_IP
If this results in the same icon, this means that your redirect worked correctly.
Conclusion
You have configured your Nginx server to use strong encryption for client connections. This will allow you serve requests securely, and will prevent outside parties from reading your traffic.