OpenCart is a free and opensource PHP-based e-commerce platform that combines useful and powerful features along with a user-friendly user interface. The platform makes it easy to manage products, orders, and users in a seamless manner. In addition, it comes packed with handy plugins which extend the platform’s functionality. In this guide, we take you through how to install OpenCart on Ubuntu 18.04 Server.
Step 1: Install Apache2
Since OpenCart is going to be administered via a web browser, we are going to install Apache webserver. Apache is a free and opensource web server that comes with tons of useful features such as SSL & Virtual hosts support which make it ideal for running OpenCart platform. Before we install OpenCart on Ubuntu 18.04, we need to have a webserver in place to serve the webpages on the front end
Before installing Apache, first, update the system repositories
# sudo apt update
Next, install apache web server by running the command
# sudo apt install apache2
Step 2: Install PHP
As pointed out earlier, OpenCart is written in PHP scripting language. As such, we need to install PHP and additional PHP modules to support OpenCart.
To install PHP, execute the command
# sudo apt-get install php libapache2-mod-php
You also need to install additional PHP modules to support OpenCart, run the command below
# sudo apt-get install php-cli php-common php-mbstring php-gd php-intl php-xml php-mysql php-zip
php-curl php-xmlrpc
Step 3: Install MariaDB
MariaDB is a free and opensource database engine that is flexible, robust and easy-to-use. Inside this database platform, we are going to create a database to store OpenCart’s data related to products, customers, sales etc.
To install MariaDB run
# sudo apt install mariadb-server mariadb-client
Next, we need to secure our database platform to ward off any intruders or anonymous users.
To accomplish this, run the command:
# mysql_secure_installation
This will present you with a series of questions that require you to set a strong password for the root user, remove test database and anonymous users and disallow remote login as root.
For security reasons, Hit Y ( Yes ) for al of the prompts.
Step 4: Configure Database & user for OpenCart
We need to create a database for OpenCArt to store all of OpenCart’s files such as sales, products, customers, etc.
Login to MariaDB
# mysql -u root -p
In this guide, we will create a database called opencartdb. Feel free to choose any name for your case
CREATE DATABASE opencartdb;
Next, create the database user and assign all privileges to the user
GRANT ALL ON opencartdb.* TO 'opencart_user'@'localhost' IDENTIFIED BY 'strong_password';
The above command creates a database user opencart_user and grants all privileges to the user. remember to replace the strong_password attribute with your own strong password.
Finally, flush privileges and exit the database engine
FLUSH PRIVILEGES;
EXIT;
Step 5: Downloading OpenCart
With the database configured, now we need to download the OpenCArt zipped file. First, navigate to /tmp directory
# cd tmp
# wget https://github.com/opencart/opencart/releases/download/3.0.2.0/3.0.2.0-OpenCart.zip
Once downloaded, unzip the OpenCart zip file as shown extract the zipped file
# unzip 3.0.2.0-opencart.zip
This unzips the zipped file to the uploads directory
We need to move this directory to the webroot directory – /var/www/html
# mv upload/ /var/www/html/opencart
Step 6: Configure the OpenCart directory
The next step is to copy a few configuration files as shown in the commands below:
# cp /var/www/html/opencart/config-dist.php /var/www/html/opencart/config.php

# cp /var/www/html/opencart/admin/config-dist.php /var/www/html/opencart/admin/config.php
Step 7: Change file permissions of the OpenCart directory
Next, we need to modify file permissions of the OpenCart directory to make it writable to the Apache web server as shown
# chmod -R 755 /var/www/html/opencart/
Next, change ownership of the OpenCart directory to
www:data# chown -R www-data:www-data /var/www/html/opencart/
Step 8: Create Virtualhost for Opencart
Next, we are going to create a virtual host file for OpenCart
# vim /etc/apache2/sites-available/opencart.conf
Paste the content as shown below
< virtualHost *:80>
ServerName example.com
DocumentRoot /var/www/html/opencart/upload/

< Directory /var/www/html/opencart/upload/>
AllowOverride All
allow from all
< /Directory>

< /VirtualHost>
Remember to replace example.com with the domain name of your server.
Save and exit the configuration file.
To enable this site run the command
# a2ensite opencart.conf
Then we need to disable the default site
# a2dissite 000-default.conf
To implement the changes, restart Apache webserver
# systemctl restart Apache2
Step 9: Enable the rewrite module
Since OpenCart requires
mod_rewrite to rewrite URLs, we shall enable the module and restart the Apache webserver.# a2enmod rewrite
Restart Apache webserver
systemctl restart apache2
Step 10: Setting up OpenCart on a browser
Having finalized all configurations, head out to your browser and browse your server’s IP address of domain name
http://domain_name or IP_address
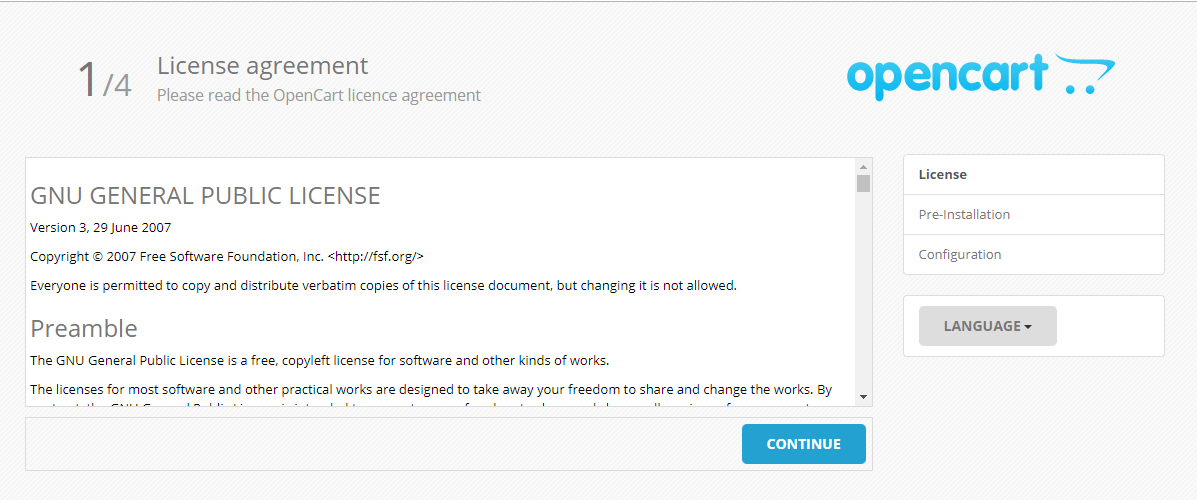
The first page displays the license agreement. Scroll down and click ‘Continue‘.
The following page displays a list of pre-installation requirements that need to be met for successful installation of OpenCart. The last column displays the status of those requirements and shows if they are met or not.

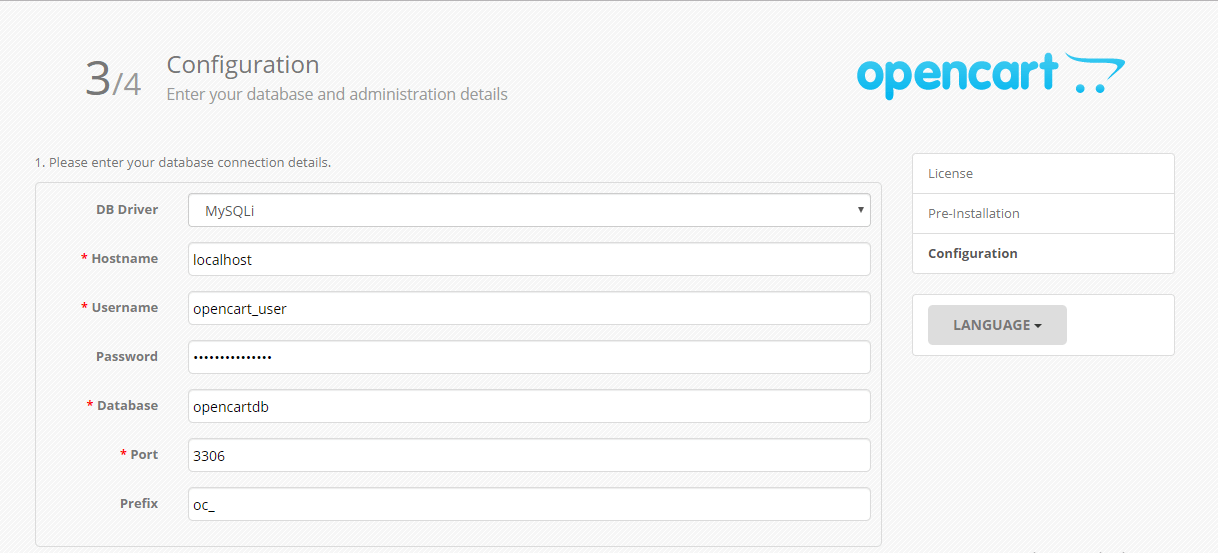
The next page will require you to fill in the database details. Enter the details you defined in the MySQL database and click ‘Continue’.
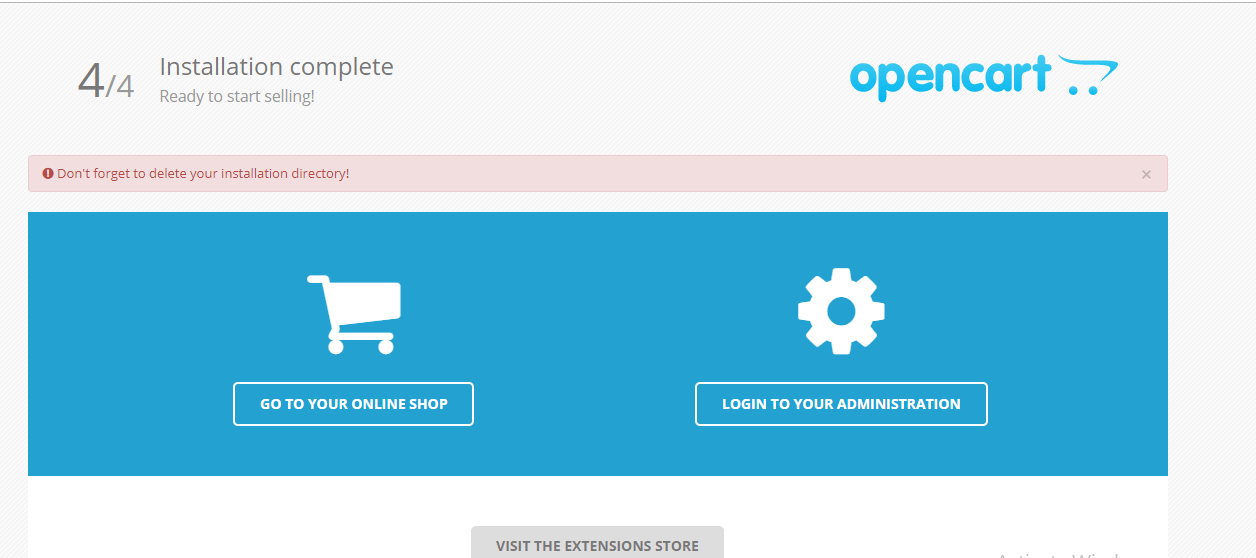
This completes the setup and Now you can click the ‘Login to your Administration’ to login to the admin dashboard.
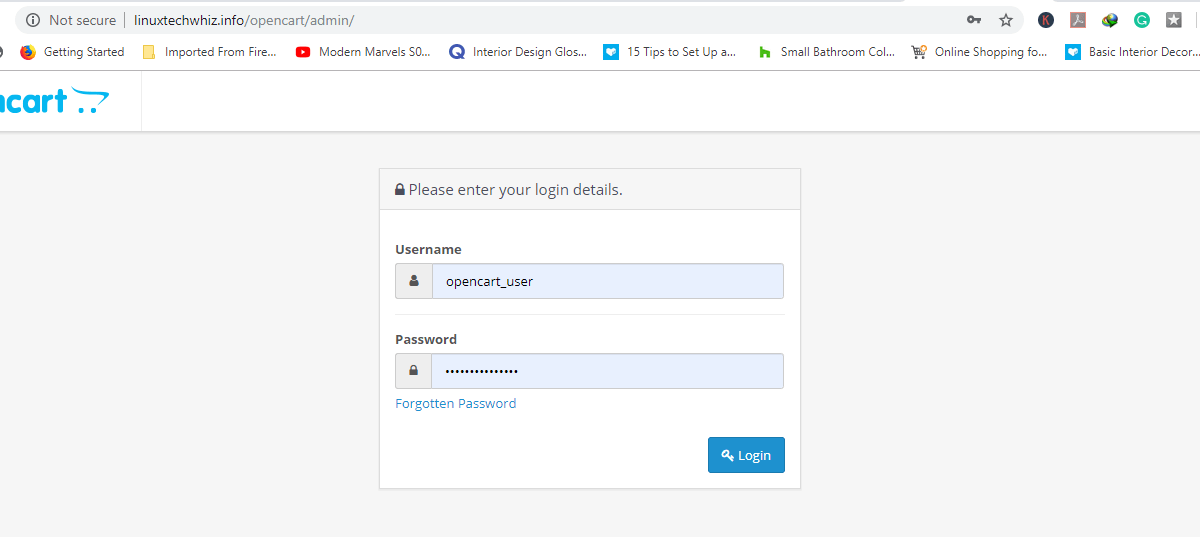
Log in with your credentials
With that, We have come to the end. In this tutorial, you learned how to install OpenCart on Ubuntu 18.04 LTS server.